Skip to Main Content

LibCal My Scheduler for UL Librarians

Manually Adding Appointments

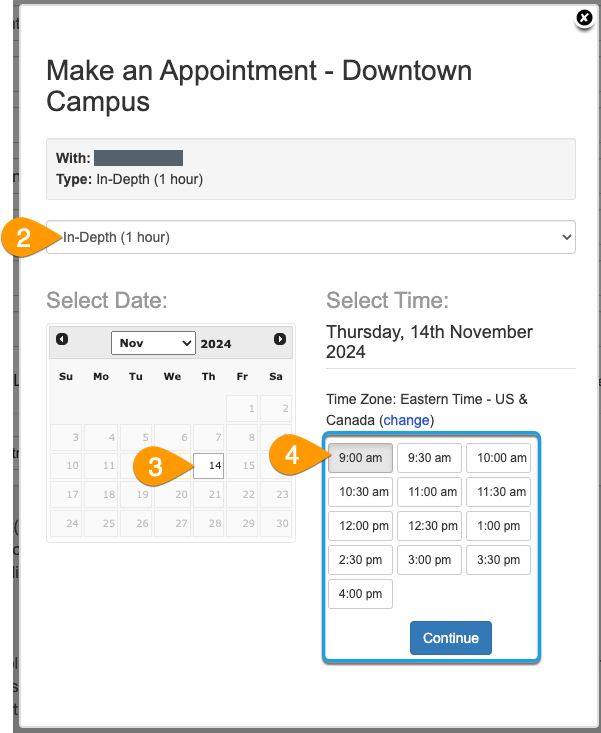
To schedule an appointment with a patron yourself:

  1. Go to My Scheduler > My Appointments.
  2. Use the Back () and Forward () buttons to the date when you want to schedule the appointment.
  3. Click the Add New Booking button.
  4. If your admin has enabled Appointment Categories for My Scheduler, use the Type dropdown select the category of session you wish to schedule.
  5. Select the time slot for the session. You can select from any slot listed as Available or Busy in Outlook/Google Calendar.
  6. Enter the patron's information into the booking form.
  7. If desired, enable the Send confirmation email to user checkbox.
  8. Click the Add Booking button.

Via the public My Scheduler page

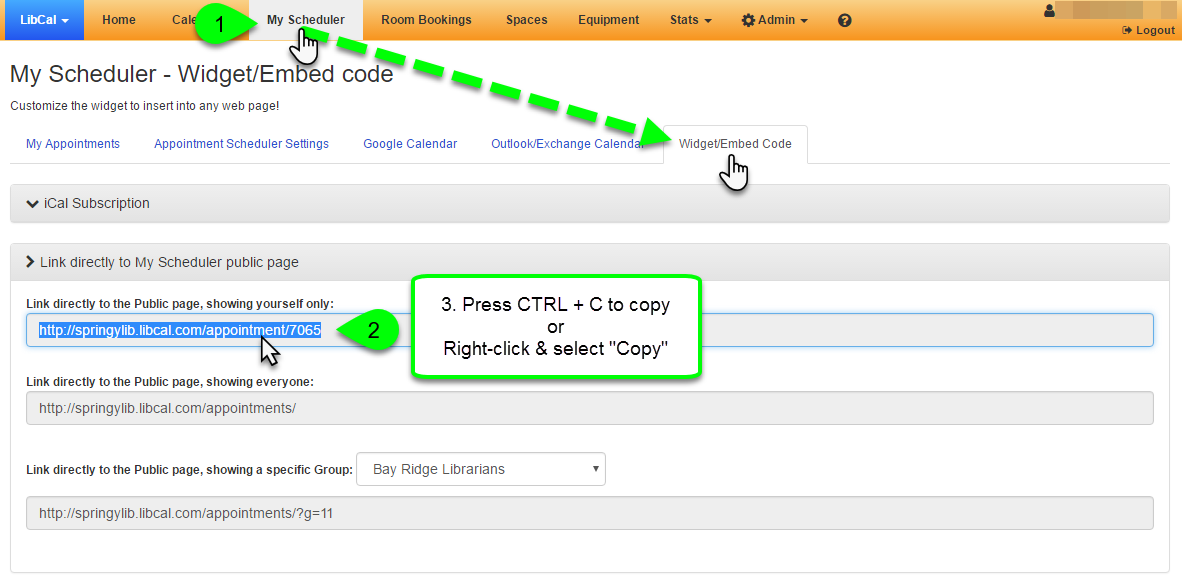
Your patrons can book their own appointments via the public appointments page. You can link to your personal booking page, or to a page showing all users in the system with My Scheduler enabled. It's also possible to link to a page for a specific group, too.

Linking to your My Scheduler public page

  1. Go to My Scheduler > Widget/Embed Code.
  2. Click on the Link directly to My Scheduler public page panel to expand it.
  3. Click on any URL to highlight it, then copy it by either:
    • Pressing CTRL + C on your keyboard
    • Right-clicking on it and selecting "Copy"

You can then use the copied URL to link to your My Scheduler page, such as in an email signature, a webpage, etc.

Example of copying the public page link

Via the My Scheduler Widget

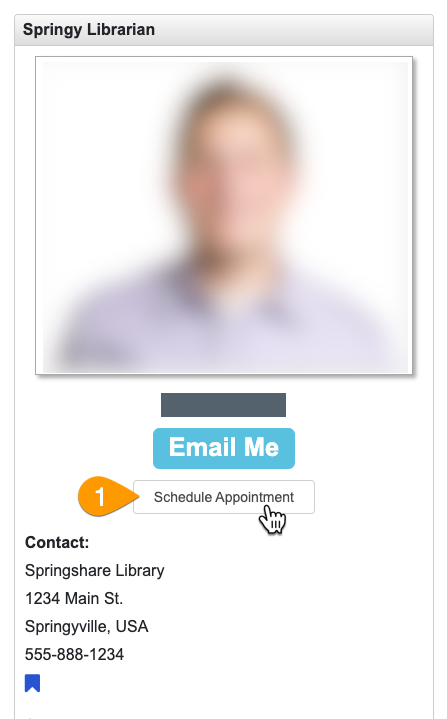
My Scheduler widgets allow you to embed a button that users can click to schedule an appointment with you, which can be especially handy in your LibGuides profile boxes! When a user clicks on the customizable button, a window will pop up allowing them to view your available appointment times and book an appointment.

It is recommended that UL Subject Librarians embed their My Scheduler Widget to their LibGuides profile.

Creating a My Scheduler widget

  1. Go to My Scheduler > Widget/Embed Code.
  2. Click on the Embed the My Scheduler Widget in external websites panel to expand it.
  3. Select which users to show in the widget. This limits who can be booked via this widget.
    • Only Myself: limits patrons to only seeing your personal availability times.
    • All users with My Scheduler enabled: this allows someone to book appointments with any available librarian.
    • Group: if your admin has enabled My Scheduler Groups, this allows users to book appointments with any available librarian in the selected group.
  4. Set the Page Title, which appears at the top of the pop-up window.


  1.  

DO NOT include jQuery if you will be embedding this inside of LibGuides or any other Springy product. jQuery is already loaded in all of our apps, so including it a second time will cause jQuery-powered elements (such as page menus) to stop working.

  1. Click the Generate/Update Code button.
    1. A working preview widget will appear -- feel free to give it a try!
  2. Click on the Embed Code to highlight it and copy it by either:
    • Pressing CTRL + C on your keyboard
    • Right-clicking on it and selecting "Copy"

Book Appointments from a Widget

Booking appointments via a widget

  1. Click on the widget's button to launch the My Scheduler window.
  2. If your admin has enabled Appointment Categories, select the category of appointment you want to schedule.
  3. Select an appointment date from the calendar.
  4. Select an appointment time on that date.
  5. Complete the booking form.
  6. Click the Confirm Appointment button.

Screenshot highlighting a My Scheduler widget's button

Example of selecting an appointment date and time

Example of submitting a booking